Bell Pepper and Egg Rings with Tomatillo Salsa

Our bell pepper plants only made one large pepper this summer, so we had to do something special with it. This is what Jesse came up with. Delicious. 

Measurements depend on how much you want to make, completely flexible.

Tomatillo salsa

7 tomatillos
3 Serranos
2 Jalapenos
2 cloves garlic (roughly chopped)
¼ cup white vinegar
salt (to taste)
1 ½ cups water

Cut tomatillos into quarters. Cut peppers into quarters length-wise. Simmer all ingredients in a saucepan until the bright green of the peppers begins to dull and the tomatillos have softened enough that a fork easily passes through their skin. When cool enough, place all in blender and blend to desired consistency.

Green bell pepper rings

eggs
garlic
Serrano pepper (if you like spicy food)
grape seed oil (or other vegetable oil)

Cut the bell pepper in to rings, 1 to 1 ½ inches wide. Remove the seeds, leaving the rings hollow. Mince the garlic, Serrano and some of the left over bell pepper for toppings.

Heat oil in a cast iron frying pan on low heat; use enough oil to cover the bottom of the pan in a generous layer. Place pepper rings into the pan and break an egg into each ring. In the same pan, off to one side, sauté the minced toppings. Cover pan with a lid. Cook until the whites of the eggs are solid. Occasionally stir the toppings, but do not move the pepper rings until they are done.

Place the pepper rings on a plate and top each with some minced garlic and peppers, sprinkle with salt, and pour the tomatillo salsa over the top (you may want to warm the salsa if it has been in the fridge).

Wheat-free Potato Gnocchi

I’ve been wanting to make wheat-free potato gnocchi for years and I finally did it! Turned out to be easier than I expected. I adapted a recipe for normal gnocchi by substituting white spelt flour and used the delicious new potatoes we have been enjoying from local farms.

Measurements are approximate; I had to adjust the amounts as I went to get the dough right.

2 lbs potatoes
2 egg yolks, beaten
1 ½ cup white spelt flour
½ tsp salt

Bake potatoes until they are tender, but not too soft. When they are cool enough, scoop them from their skins and pass them through the fine side of a grater. Add the other ingredients and mix with hands. Adjust until the dough is the right consistency; you may need to add more flour if it is too wet or a little water if it won’t hold together. You want it just sticky enough that you can roll it into snakes, but not too sticky. Do not over mix; no kneading necessary.

On a floured surface, gently roll the dough with your hands into snakes about ¾ inch in diameter. Cut the snakes into 1 inch lengths, then press an indentation into each piece with you finger tip.

At this point, you can freeze any extra gnocchi by spreading it out on a cookie sheet in the freezer. Once frozen you can consolidate into a bag. When you want to cook it, just drop it into boiling water as described below (I did this, but haven’t tried cooking the frozen stuff yet, so not sure how well it works).

To cook the pasta fresh, bring a large pot of water to a boil, reduce to a simmer, and drop the gnocchi in a few at a time. When they float up to the surface the gnocchi are done (this will only take a couple of minutes), take them out and put in the next batch until all are cooked.

I topped them off with fresh pesto from our garden, but you can use whatever sauce you like. Enjoy!

Caprese Plus

We are in the dog days of summer and everything is ripe and ready to eat.  It is far too hot to cook indoors and as the evenings are getting cool it is a reminder to spend as much time outdoors as possible because the famous Oregon rain will be here soon.

This meal came out of a long day followed by bad news.  I found myself standing with the fridge door open wondering what was inside.  I have always loved caprese salad when the tomatoes are ripe and since I can’t leave well enough alone, I riffed on the theme.  Feel free to add whatever you have on hand.

Traditional Ingredients:

  • 1-2 perfectly ripe beefsteak type tomato (heirloom have the best flavor)
  • 1/2 lb of fresh mozzarella (I usually have equal parts tomato to mozzarella)
  • handful of basil leaves
  • olive oil (if you have a fancy bottle, this would be the time to break it out)
  • salt & pepper (use your fancy salt & fresh cracked pepper)

What we added:

  • 2 ears of corn, roasted on the bbq, kernals cut off
  • 2 sweet peppers, cut & seeded
  • 4 slices of crusty bread, toasted and rubbed down with a raw garlic clove

Preparation:

Traditionally the tomatoes are cut into slices like you’d put on a sandwich.  We elected to cut them into ‘segments’ (not sure what to call them – see photos).  The mozzarella that we had was the large buffalo type – the 2 balls in the container were the size of a decent sized tomato (although any size would do). The cheese was cut the same way as the tomato.  These were arranged around the side of the platter leaving a hole in the middle.

In the hole we piled the roasted corn.  Then the handful of basil was thrown on.  We had some extra mozzarella that didn’t fit with the display below – it was added on top.  The sweet pepper was sprinkled around.

Add anything you’ve got ripe in the garden or attracting fruit flies on your counter.  Maybe peas, or grilled zucchini, cherry tomatoes, new potatoes, olives, artichoke hearts, green beans?  This starts heading toward a salad nicoise but that is my favorite meal on this earth – so I can’t fault you there.

A healthy amount of olive oil was poured over.  Sprinkle salt and crack pepper over the top.

The bread was toasted & rubbed down with a raw garlic clove on one side.  Drizzle a little olive oil on the bread.  The bread is great to soaking up the olive oil and tomato juice collecting on the bottom of the serving plate.

Open the bottle of white wine.  If its cheap like ours add a few ice cubes and enjoy!

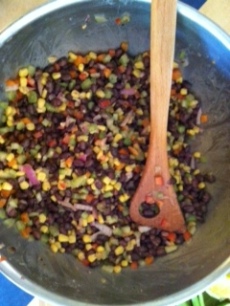
Lunch for Cooper – Black Bean Salad

This recipe is very loose and changes with what I have on hand and what is in season or is cheap.

Image

  • 2 cups dried black beans (or two 15 oz cans)
  • 1/4-1/2 red onion, diced (depending on how much you like raw onion)
  • 2-4 ears of corn, raw or roasted on the BBQ (or small bag of frozen corn)
  • 1-2 bell peppers (orange and red for color)
  • 4 stalks of celery, diced
  • 1/2 of a jicama, diced (or any other crunchy vegetable that you enjoy)
  • cherry tomatoes, cut in half (optional)
  • basil or cilantro (depending on where you want to go with the dressing)
  • juice of 2-3 limes/lemons
  • olive oil
  • salt and pepper
  • smoked paprika or some other interesting spice
  • sherry or apple cider vinegar

Soak the black beans in water over night, changing water 2-3 times.  If you don’t have over night, use hot tap water to speed up the process.  Rinse beans, cover in water and bring to a boil.  Lower temperature to simmer, cover and check at 30 minutes.  You want the beans to be tender but holding together.  Depending on how long you soaked them and other factors (your stove, your beans, the position of the moon) they will take 35-45 minutes to cook.

Image

While the beans are cooking, cut up all your veg and put in a bowl.  I am not a huge fan of raw onion, so I soak my diced onion in water for a bit before straining and adding to veggies.

Juice your lemons and add to small jar, add olive oil until you have the standard vinaigrette ratio (two parts acid to 1 part fat, right?).  Add salt and pepper to taste.  Make sure this is ready when the beans are done cooking.

When beans are done cooking, pour them into a strainer.  Then pour beans over veggies in large bowl.  Pour vinaigrette over beans – by doing this when they are hot they soak up lots of the flavor.  You will notice that even though you poured almost a cup of liquid over that there is nothing in the bottom of the bowl.  Add whatever herbs/spices you want, some splashes of vinegar and more salt and pepper to taste (but don’t get to anal at this point).  Cover the bowl and let it sit for an hour or more.  The beans continue to soak up the flavor and you’ll find that what was salted and dressed perfectly has changed within an hour.  This salad keeps for a week in the fridge – we eat a bit everyday and each day it is different.  By the end of the week we are eating it with hot sauce by the chipful.  It is good alongside other stuff, eaten cold or at room temperature.

Have fun & enjoy.

Dinner for Cooper – Chicken Tagine w/ Apricots & Almonds

Chicken Tagine w/ Apricots & Almonds

adapted from Gormet, May 2006 via Epicurious

  • 1 teaspoon ground cinnamon
  • 1 teaspoon ground ginger
  • 1/2 teaspoon turmeric
  • 1/2 teaspoon black pepper
  • 1 1/4 teaspoons salt
  • 3 tablespoons plus 1/4 cup olive oil
  • 1 (3-lb) chicken, cut into 6 pieces, wings and backbone discarded (I cut the breasts in half to make them more manageable)
  • 1 tablespoon unsalted butter
  • 1 medium red onion, halved, then sliced 1/4 inch
  • 4 garlic cloves, finely chopped
  • 5 sprigs fresh cilantro
  • 5 sprigs fresh flat-leaf parsley
  • 1 1/2 cups water
  • 2 tablespoons honey
  • 1 cinnamon stick
  • 1/2 cup dried Turkish apricots, separated into halves (I had dried apricots and don’t know how they compare to Turkish ones)
  • 1/3 cup whole blanched almonds (I had a bag of slivered, toasted almonds from TJs)
Preparation:

Stir together ground cinnamon, ginger, turmeric, pepper, 1 teaspoon salt, and 2 tablespoons oil in a large bowl. Add chicken and turn to coat well.

Heat butter and 1 tablespoon oil in base of tagine (or in skillet or dutch oven), uncovered, over moderate heat until hot but not smoking, then brown half of chicken, skin sides down, turning over once, 8 to 12 minutes. Transfer to a plate. Brown remaining chicken in same manner, adding any spice mixture left in bowl.

Add onion and remaining 1/4 teaspoon salt to tagine and cook, uncovered, stirring frequently, until soft, about 8 minutes. Add garlic and cook, stirring occasionally, 3 minutes. Tie cilantro and parsley into a bundle with kitchen string and add to tagine along with 1/2 cup water, chicken, and any juices accumulated on plate. Reduce heat and simmer, covered, 30 minutes. (I added another 1/2 cup of water here because it seemed so dry.  In the end, I cracked the lid to let off some of the extra water.  The liquid at the end is yummy so some extra doesn’t seem to be an issue. I also at halftime, I flipped the chicken because it wasn’t fully submerged.)

While chicken cooks, bring honey, remaining cup water, cinnamon stick, and apricots to a boil in a 1- to 2-quart heavy saucepan, then reduce heat and simmer, uncovered, until apricots are very tender (add more water if necessary). Once apricots are tender, simmer until liquid is reduced to a glaze, 10 to 15 minutes.

While apricots cook, heat remaining 1/4 cup oil in a small skillet over moderate heat and cook almonds, stirring occasionally, until just golden, 1 to 2 minutes. Transfer with a slotted spoon to paper towels to drain. (Here I had already toasted almonds from TJs.)

Ten minutes before chicken is done, add apricot mixture to tagine. Discard herbs and cinnamon stick, then serve chicken sprinkled with almonds on top.

Traditionally, this is served with couscous.  Due to Cooper’s mom being allergic to wheat, I am delivering the tagine along with a bag of raw quinoa for cooking at dinner time.

~~~~

Original Recipe here: http://www.epicurious.com/recipes/food/views/Chicken-Tagine-with-Apricots-and-Almonds-234649